Showing posts with label canning. Show all posts

Saturday

Canning Salmon

     My husband and son came home with a nice catch the other day, so it was canning time.   We (as in the girls of the family) love canned salmon.   A pint jar can become salmon patties or salmon salad in short time.  All the bones just "melt" after it is canned and it becomes an excellent source of calcium.

     Salmon must be canned in a pressure canner.  At my elevation I canned it at 10 lbs. pressure for 100 minutes.  Only 1 hour west of me the elevation changes and it would have to be at 15 lbs. pressure.  Always know your elevation when pressure canning, the elevation changes the temperature at which water boils -- and therefore the safety of your product if not done with the correct pressure.


I use variations of my mother-in-law's recipe.
1/2 tsp. salt
2 TBL. ketchup
1 TBL. oil
Sometimes I just leave the oil and ketchup out.


My husband does all the prep work with the salmon.
He fillets, skins, and chunks it all for me.

 Pack the jars tightly with chunked salmon.
Leave 1 inch headspace.
DO NOT add any liquid -- it will make it's own juice.


It never looks all that appetizing after it is canned.
BUT IT IS GOOD!
Only 2 medium size salmon gave me 11 pints on the shelf.
 .....dr momi

Linked To: Homestead Barnhop #65
Linked To: Carnival of Home Preserving #15

Friday

Never Trust A White Pickle

That is the conclusion my grandkids have come to.

Last year somehow without knowing it, I picked up "white pickle" seed. (I'm sure it has a name but I have no clue what it is.) It just so happened I hadn't perfected my pickle recipe yet, and all those white pickles got canned with a very "vinegary" (new word) recipe.  It'll make you pucker.

Later in the summer, someone gave me a bunch of green pickles and I canned those with the "best pickle recipe ever".  My grandkids loved them.  They loved them so much that I am now done canning pickles in pints -- it's all quarts from now on.

They loved them so much that all the green pickles are gone.

I tried to pass off the white pickles as the green one's two Sunday's ago.

My kids didn't raise no dummies.

There's probably about 20 pints of white pickles in the pantry.  I'm not eating them!
(I made sure to buy green pickle seed for this year's garden.)


.....dr momi

Linked To: Homestead Barn Hop #56
Linked To: Frugal Days Sustainable Ways #21

Canning Jam With Stevia

    This is my personal opinion....I don't like it. :-)  I've been trying to get ready for the Canning 101 Strawberry Jam post, but all the strawberries in my freezer got me experimenting first.
The first batch of jam was with strawberries, lemon juice, Stevia in the Raw, and low sugar pectin.  I followed the Ball recipe and used 2 cups of stevia instead of sugar..  It was so sour it was inedible. The second batch was with strawberries, lemon juice, 4 1/2 cups of Stevia in the Raw, and low sugar pectin.  Not as sour, but just lacking a good strawberry taste.

    Here is my beef.....I can't get the after taste out of my mouth!  Is this what they mean by bitter tasting? (that's what most authorities say canning with stevia tastes like) So, second batch inedible!  I am of the opinion it is better to can the jam without sugar using low sugar pectin, and then add the stevia after you open it up.  That's if you need to go sugar-free.   It's the heat that supposedly makes the stevia bitter.

     Using low sugar pectin and about 1/2 the sugar most recipes call for, is probably the direction I will be going.  Sugar actually brings out the flavor of the jam and helps preserve the color.  No one around here is eating gobs of it.


      I also had a terrible time with foaming and floating fruit.  There's no way I'd try to sell these at the Farmer's Market.  Has anyone else out there tried canning with Stevia?  What were your results?

.....dr momi

Linked To: Farm Girl Friday Blog Hop # 49

Saturday

Canning Maple Syrup

     I knew people did it, but; I wasn't sure it was safe.  So, it was a question I asked twice at my Master Food Preserver class.

     Me...."so you can can the maple syrup just by putting hot maple syrup into the (hot) canning jar, and putting the lid on?"

     Barbara Ingham (head food scientist for the state of Wisconsin)...."yes"

     Me...."so, you can take the maple syrup out of it's pan, fill a canning jar, put the lid on it, it seals, and then you can put it on the shelf?"

     Barbara Ingham...."yes"

     Think of the freezer space freed up!  That's how we do it now.  Just like a bazillion other people in Northeast Wisconsin. :-)  I guess after it has cooked for so long, it is considered safe.  I don't understand how with it being an alkaline food it can be canned this way, but evidently, no one has ever died from canned maple syrup.  Using it to sweeten your canned goods though, is not wise.  Again, because of it's alkaline nature, it changes the pH of the jar you are canning -- that can be dangerous.

     So, sterilize your jars, keep them hot, fill with hot maple syrup to 1/4 inch, put on a warmed up lid, screw the band on to finger-tip tight, and sit back and listen to them seal!


Do not look at the headspace on these jars! :-)


.....jean

Linked To: Homestead Barn Hop # 53

Friday

Canning 101.....Do I Need A Recipe?

     Not every canning recipe you find out there in blogland is necessarily safe.  A safe recipe for water bath canning is all about the pH of the total amount of ingredients in the recipe.  Water bath canning is only safe if all the ingredients together comprise a pH of 4.6 or lower.  If the pH is 4.6 or higher, you need to use a pressure canner.  If your ingredients are acid enough (low pH) they will not support the growth of Clostridium botulinum that causes Botulism.

     So how do you know what the pH of your recipe is?  The best way to be safe is to use a tested recipe.  All the recipes in the Ball Blue Book guide to preserving and the Ball Complete Book of Home Preserving have been tested by their kitchen.  They know what the pH is. I'm sure there are more tested recipes out there -- probably from your extension offices, but, there aren't all that many.  Why?  It's expensive testing. (It's my understanding we are talking something way beyond dipping in a piece of litmus paper.)

     Now, there's lots of canning book recipes out there, but the recipes are not tested.  In general, those recipes will probably be fine.  If someone is writing a book about canning, hopefully they know what they are talking about.  But here's where I have a real hard time when I'm blog reading -- someones grandma's recipe that they've "added" to.  First of all, grandma's recipe could very well not be safe to start with, and then adding more ingredients (especially vegetables) could be making it all the more alkaline.

      Here's an example.  Say you start with a tested salsa recipe (or your grandma's recipe).  This is a recipe with plenty of vinegar in it and is just under that 4.6 pH.....but, it's safe to water bath can.  Your taste for hot peppers however makes you add in another cup of peppers, and you saw on someones blog that a great way to use up some of your zucchini is in salsa, so you add another cup of zucchini.  All of a sudden, you have a recipe over 4.6 pH that is not safe to water bath can.

Here's some pH values:

pH 3.0 - 4.0   ......apples, berries, cherries, lemons, oranges, peaches,  pears (Asian pears are
                            the exception), and pickles

pH 4.0 - 5.0   ......tomatoes with added acid (tomatoes are tricky, they will have their own post)

pH 5.0 - 6.0   ......carrots, beans, onions, peppers, potatoes, squash, and most meats

pH 6.0 - 7.0   ......corn, mushrooms, peas, and chicken


The Ball Blue Book is updated every little bit.
Mine is from 2009....time to maybe get a new one this year.

I use both books a lot.
....and I haven't even touched everything you can can.
Oh the possibilities!


Check out the rest of the Canning 101 series:

Canning 101.....Here's the Rest of the Tools
Canning 101 -- Tools Of The Trade
Canning 101.....Who Cares About Headspace
Canning 101 -- Why 2-Piece Lids?

.....jean


Linked To: Farmgirl Friday Blog Hop #45
Linked To: Homestead Barn Hop # 50

Thursday

Canning 101 .....Here's the Rest of the Tools

The jar lifter:


.....no, not the CAR lifter, the JAR lifter!


Squeeze the handles together at the top
and the bottom grips the jars tight.
 
     Always use a jar lifter to take jars out of boiling water -- and to put them in for that matter.  I've tried fishing jars out with a spoon and potholder, now that's a great way to end up in the ER.  I have never had an accident using the jar lifter, they work great.


      We will talk pressure canners in a separate post.  To water bath can , (that would be your jams and jellies, fruits and sometimes tomatoes),  you'll need a deep pot.  Not necessarily a wide pot but a deep (tall?) pot.  In the picture is my large enamel water bath pot.  I have a smaller one too, that I use quite a bit.  You can use the wire "rack" that comes with it, (in front of the enamel pot in the picture) to pull your jars from the hot water, or, for me it's just as easy to only use that rack in the bottom of the pot, to make sure the jars aren't sitting directly on the bottom, and take the jars out with the jar lifter.  Every time I try to lift that rack out when it is full, I end up joggling jars all over the place.

     I use the stainless steel pot to cook my jams and jellies in, and also as a water bath canner.  (I usually use a smaller size stainless pot,  but there's chicken soup cooking in it right now :-)  The piece of metal in front of it is part of my pressure cooker.  I use it in the bottom of the pot to make sure the jars are not directly on the bottom.  You will be risking it if you put the jars directly on the bottom with nothing in between.  Jars will bust, and all your hard work will be gone.

     Side-Note...If you ever see that small piece of metal from a pressure cooker at a rummage sale, snatch it up.  Brand new they are $15.00 !  .....and if you ever see a pressure canner at a rummage sale, snatch it up ! All new parts can be bought for it, and you will end up with a great pressure canner for 1/2 the price.

     Of course some big spoons and ladles will be needed, and jars, lids, and rings are understood.  ....and don't forget the bubble freer we talked about in the last post of the series.  If you only get started water bath canning, you could put up lots of good food.

      Let's see, some of the things I water bath canned last year.  Dill pickles, bread and butter pickles, pickle relish, grape juice, apple juice, pineapple, peaches, cherries, applesauce, barbecue sauce, ketchup, blueberry spice jam, elderberry jam, strawberry jam, apple jelly, and apple pie filling.  I'm sure I missed something, and this barely dents what you can do with the water bath canner!  So, if you are eager to get your feet wet canning, this is the place to start! Next week we'll can some strawberry jam together.

Other posts from the Canning 101 Series:

Canning 101 -- Tools Of The Trade
Canning 101 ...Who Cares About Headspace
Canning 101 -- Why A Two Piece Lid?


.....jean

Linked To: Farmgirl Friday Blog Hop # 44
                  Homestead Barn Hop #49

Friday

Canning 101 -- Tools Of The Trade


The Bubble Freer:
    
     The thing I keep forgetting to use.  It's important to use.  If there are a lot of bubbles left in your canned food, it means there is oxygen left in the canned food.  Oxygen = mold, bacteria, etc.  Using something as a bubble freer after the food is in the jar and before you put the lid on, is needed.  There are plastic flexible sticks sold for this, or you could use a small spatula.  The bubble freer goes along the inside perimeter of the jar and then  gently gets pulled toward the center -- bubbles will escape.  I will do that 4 or 5 times around the jar.


Two different batches of applesauce.
No bubble freer used on the left.
It's a big difference.  Note to self....USE THE BUBBLE FREER!


Read The Rest Of The Series:
Canning 101 -- Who Cares About Headspace
Canning 101 -- Why 2-Piece Lids?

.....jean

Linked To: Farm Photo Friday
Linked To: Preparedness Challenge # 31
LInked To: Homestead Barn Hop #47

Canning 101...Who Cares About Headspace?

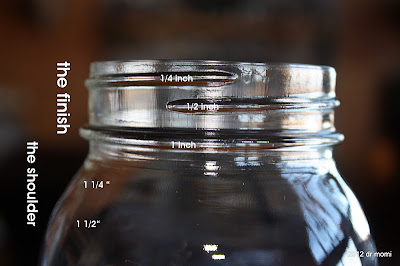
     The space in the canning jar from the underside of the lid to the top of the food or liquid in the jar is called the headspace.  Too little headspace, and the food may bubble over during processing.  The residual food may interfere with the seal of the lid, not to mention making a mess in the canner.  Too much headspace and the food at the top may discolor in storage.

     Too little headspace is usually my problem if I'm going to have one.  There's nothing worse than canned salmon over flowing it's jar in the pressure canner!  Learning where the headspace is on your jar really helps a lot.


Turn your jar to where the threads "overlap".
That is not necessarily the front of the jar.


1/4 inch is at the first thread.
1/2 inch is at the middle thread.
1 inch is just below the "finish". (just below that last "thread")
1 1/4 inches is halfway down the shoulder.
1 1/2 inches is just below the shoulder.


     When you are using your jar filler, get used to where these marks are on your filler.  On my filler, just to the bottom of it is 1 inch.  The more you can, knowing where your headspace marks are, just comes naturally.

     Different foods have different headspace because of how that food expands or doesn't expand in the jar.  Your recipe usually tells you how much headspace you should leave.  When I can foods to compete at my county fair, headspace is very important to the judge.  The wrong headspace will be disqualified right away.  These are the headspaces required for our fair, and in general, what you should use for everyday canning.

Jams and Jellies.......1/4 inch
Pickles......................1/2 inch
Fruits........................1/2 inch
Tomatoes.................1/2 inch
Vegetables...............1 inch
Meats.......................1 to 1 1/2 inches


Read the rest of the series (just getting started):
Canning 101 -- Why 2-Piece Lids?

.....jean

Linked To: Farmgirl Friday Blog Hop
Linked To: Homestead Barn Hop

Monday

Canning 101 -- Why 2-Piece Lids?


      Everybody raise your hands that has canned something in a 1-piece lid.  You know, you saved the jar and it's lid, reused it to can your jelly, and it worked good -- a nice seal by the sound of the "pop" when you opened it.  I did it.  Then I found out why I shouldn't.

     When a manufacturer cans ....say...their artichokes in a jar, they fill that jar right up to the very top with liquid and then use a device to create a vacuum that sucks any air out of the jar. At the very same time, the lid is put on.  This is all done by machine.

     In home canning we have no devise to get all the air out of the jar.  This is where a two-piece lid comes in.  By a two-piece lid I mean the canning lid and the screw band.  When in a water bath or pressure canner, a two-piece lid allows air to escape from the jar.  This is why you only put the rings on to finger-tip pressure -- not tight.  You want that air to escape. 
Reusable Tattler lids are also a 2-piece lid, which you put on to finger-tip pressure, but then you have to remember to tighten the lid when it comes out of the canner to get a nice seal.

     So what's the big problem with oxygen in your canned jar?  Well, some bacteria thrive on it, but that's not the main reason to make sure there is no oxygen in your jar. The bacteria can be controlled with acidity.  Mold is probably the main reason to get the oxygen out of your jar.  Molds require air and water to grow.  The other reason is food quality.  The color, flavor, and odor of the canned goods are all compromised when there is air in the jar. 

     This is a start to a series of Canning 101 posts..I can find time to write them now, ..... in the middle of canning season.....not so much. :-)


Tsk, Tsk miss jean.  Yes I did it.
A just opened jar of strawberry jam from 2 years ago.
No I'm not throwing it away, but, .....not doing it any more.

.....jean

Linked To: Homestead Barn Hop

Tuesday

Pico de Gallo

     This is a favorite when the tomatoes are fresh.  We (as in the whole family) have it about 3 or 4 times when the garden is overflowing.


Pico de Gallo always reminds me of Mexico.
....ahhh sunning on the beach, watching the pelicans fly by,
sipping pina coladas (..er diet coke), someone else cookin' for me,....
...oh, OK I'm back.


Pico de Gallo
     (for a crowd)

20 roma tomatoes
1 lg, red onion
1 lg. jalapeno pepper
1 sm.banana pepper (feel free to mix 'n match peppers)
4 cloves of garlic
juice of 2 limes
2 TBL. olive oil
1 bunch of fresh cilantro
2 tsp. salt
1 tsp. pepper


Cut the stem off the tomatoes, slice them in half lengthwise,
"v" out the hard core, and then dice.


Do the same with the pepper.  Take out the seeds and "pulpy stuff".
Don't touch your eyes with pepper juice hands....you'll be sorry :-)


     Dice the onions and garlic.  Fine cut the cilantro.  Throw in the lime juice, oil, salt and pepper.


...and mix it all together

Enjoy!


     I forgot to take a picture of the final stir LOL!  I can easily make this my whole meal it tastes so good.  I get lots of questions about how you can can pico de gallo so it tastes just like it does fresh.  Aaahhh....not going to happen.  Eat the fresh when you have it.  Follow a tested recipe to can salsa, and that's what we eat in the winter.  When you are canning salsa, please don't add vegetables just because you like your salsa that way.  Vegetables (onions, peppers etc.) change how acid the recipe is.  If you are not following a tested recipe, it can quickly become unsafe to can.

.....dr momi

Linked to:  Women Living Well Wednesday
Linked to:  Simple Lives Thursday
Linked to:  Farm Friend Friday
Linked to:  Living Well Blog Hop

Elderberry Jam Review


                                                      Rita's Gr-Gr-Mom's Elderberry Jam
                                                                     Here's the recipe.


It jelled to the perfect consistency with no added pectin.
You have to really watch it the last 10 minutes -- stir constantly.


I agree with Rita's Great Grandmother -- it is DELICIOUS!
Tastes "elderberry-y" with a hint of orange at the end -- different and good!

I must have used an apple that doesn't go "mushy" very easy.  I cooked down the
apples till most was smooth.  But, even after the extra 30 minutes of cooking, I still had some
apple chunks.  Don't get me wrong, it still tastes wonderful,  I would just dice the apples next time.
I love the whole elderberries in it -- just plain pretty to look at :-)

The recipe made 10 half pint jars.
(Christmas presents!!!!)

.....dr momi

Linked to:  Works-For-Me Wednesday
Linked to:  Living Well Wednesday's
Linked to:  Time Travel Thursday
Linked to:  Farm Photo Friday


Monday

Rita's Gr-Gr-Mom's Elderberry Jam

r

     I begged this recipe off my friend Rita.  We were talking elderberries, when she told me about her great grandmother hand writing her recipes -- elderberry jam being one of them.  I had the recipe with me when I attended the Master Food Preserver Class. "Is there anything wrong with canning this recipe?" I asked my teacher, Barbara Ingham, the head food scientist for the state of Wisconsin.  "This should be perfectly fine.  Do you know why? --- Because everything in it is an acid."

     So there you have it.  It's not a tested recipe.  But, it's got the o.k. from the very top.


~~~~~~~~~~~~~~~~~~~~~~~~~~~~~~~~~~~~~~~~~~~~~~~~~~~~~~~~~~~~~~~~~~~~~~~~~~

Rita's Gr-Gr-Mom's Elderberry Jam

1 quart of elderberries
5 cups sugar
12 large cooking apples
3 medium size oranges
1 lemon

Cook apples until mushy.  Add elderberries, oranges, and lemon chopped fine.  Grate the rind of 1 orange and the lemon.  Mix all with the sugar and boil 30 minutes.  Delicious


~~~~~~~~~~~~~~~~~~~~~~~~~~~~~~~~~~~~~~~~~~~~~~~~~~~~~~~~~~~~~~~~~~~~~~~~~~
     I love the "delicious" at the end. :-)  If you are canning it, you would fill the jars to 1/4 in. and process in a water bath canner for 10 minutes.  You'll notice there is no pectin in the recipe.  I'm sure that's where the apples and the orange and lemon peel help out, they are full of pectin.

     I'm making it today, I'll let you know how it turns out.  Thanks for sharing Rita!!

.....dr momi

Linked to:  Homestead Barn Hop

Thursday

Black Ice Cream Vitamins

     ....that's what my grandkids call the elderberry syrup that is kept in the freezer.  It does look black! (deep purple)  When the kids are fighting a cold, the moms will go into the freezer, scoop out a spoonful of frozen elderberry, and give it to them.  My kids/kids-in-laws (the moms) swear by it.

     The elderberries are just starting here in northeastern Wisconsin.  In fact, the chickens got quite a few that were just not quite ripe.  When they are ripe, they come right off the stem when you gently squeeze, pull and twist the berries between your thumb and forefinger.  (Some people use a fork to strip them.)  It's tedious work, but so worth it.  I will be putting up enough elderberries for 3 gallons of elderberry wine, a new elderberry jam recipe I want to try, and, elderberry syrup for all the grandkids  for the winter.


Picked and ready to stem (de-stem? -- you know -- take the berries off the stem :-)


I try not to be a perfectionist.  There's plenty of berries that hang on to the stems.
These get recycled to the chickens.  A great treat for them.


4 quarts of elderberries.


     I will can some syrup in 1/2 pint jars -- just enough for one person for a couple of days during a cold.  A pint could easily be too much and I don't want any wasted after all the hard work.  But, this first batch will be for the freezer, just for the grandkids.  They can store it in their freezer :-)


For each quart of berries add 1 cup of water.
Bring it to a boil, then simmer 5 minutes.
Gently crush the berries with a potato masher.  Do it gently so that
the seeds don't crush too bad.  The seeds can upset some people's stomach.
Now simmer for 5 more minutes.

     Strain off the juice through a dish towel lined colander.  Let it sit for 20 minutes.  For each quart of berries you should end up with 2 cups of juice.  For each cup of juice add in 1 TBL. of lemon juice.  Now it's up to you how sweet you want it and what sweetener to use.  Don't use maple syrup if you are going to can itDon't use honey for children under 2.   Because this batch is "Black Ice Cream Vitamins"  and it is specifically for sick kids who may need to be enticed to eat it, I did use sugar.  3/4 cup to a cup of juice --  I know it sounds like a lot, but those berries are a bit tart.  They only will be eating 3 or 4 spoonfuls a day when sick.


16 half pints of Black Ice Cream Vitamins
ready for the freezer.  (I left a good 1 inch headspace)
Grandbabies should be covered for the winter.
      .....dr momi


Linked to:  Living Well Blog Hop
Linked to:  Preparedness Challenge

Saturday

How Do You Can Your Tomatoes.....This Is A Test :-)

Not the best tomatoes this year.....these are destined for tomorrows Pico de Gallo
   
     Today I spent the morning at our local Farmers Market answering canning questions at the Master Food Preserver table.  All I can say is....there's an awful lot of people canning "on the edge" out there.  Usually they are canning like their mother showed them, who learned from her mother.  A lot of science has been revealed since Grandma was canning, and therefore methods have changed.

     Here was the "best" (not!) answer to my question "How do you can your tomatoes?" today.

     "I heat the jars, and put hot tomatoes in them.  I put on a 2 piece lid.  It seals.  Then I put them on the shelf.  (...and then the qualifier came)  It's how I've always done them, and how my mom did them, and how my grandma did them....and none of us are dead yet!"

    May I just say..."your odds are getting closer after 3 generations :-)"  Hot tomatoes into hot jars, add the lids...but then they must be processed.  You can process tomatoes in the pressure canner or water bath canner.  However, if you use the water bath, you must add lemon juice, (1 TBL./pint or 2 TBL./Qt.) or citric acid ( 1/4 tsp./pint or 1/2 tsp./qt.) to make sure the tomatoes are acid enough.  New varieties of tomatoes are not as acid as they used to be, and the growing season conditions can make a big difference in the acidity that year.

     Never assume because the lid seals on a jar that the product is safe.  It's only safe if you have followed a tested recipe, and processed it with the right method for the correct amount of time.  If you've done it all right, the top food scientist for the state of Wisconsin says its OK to eat "fifty years from now".  You'll loose flavor, but you won't die from eating it. :-)


Monday

Pickles -- All Day!

     I didn't know that I planted white pickles.  I didn't even know there was such a thing.  How do I order seeds and not know they are white -- you got me.   I wasn't liking them.  


They just look so pale as dill pickles.

     Then I made bread & butter pickles with them.  I used the "British variation" of the  Traditional Bread and Butter Pickles in the Ball Complete Book of Home Preserving. (pg. 303)   The white pickles in the brown pickling mixture was pretty!


 British Bread & Butter pickles.

       A patient of Rick's gave him some started cucumbers this spring.  I made some sweet pickle relish out of them.  3/4 of the way through chopping all the onions ( no mascara left!), peppers, and cucumbers; I remembered the "chopping tip" we learned at the Master Food Preserver class.  This was a tip for the dehydrating part. --- Put the veggie you need to chop in the blender (cut in big chunks) and fill the blender 3/4 full with water.  Now pulse it a couple of times.  Pour everything into a strainer, and let it drain a bit.  It's faster and quicker to clean up than the food processor.  You now have perfect size chopped veggies for the dehydrator. It sure would have worked for my relish too!


I canned the sweet pickle relish in small
jars.  The perfect size for egg salad etc.


29 jars of pickles.  One didn't seal.
Check out the tomatoes in the back -- tomorrows work.
.....dr momi

Linked to:   Home Haven Thursday

Wednesday

Pears -- Which One?

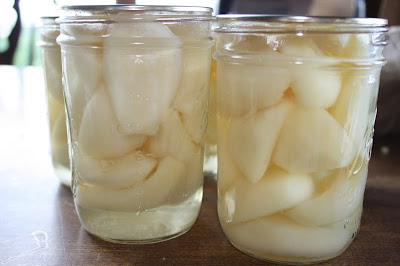
Hhmmmm....which one should I pull for my fair entry?

     It's a no-brainer.  The one on the left has "floating fruit".  The pears didn't get packed tight enough. 
Which is a hard thing to do with such a soft fruit.  The one on the right I do believe is a blue ribbon! 1/2 inch headspace and no floating fruit, lol!, we'll see what the judge says. 

     I canned 7 pints of organic pears and only 2 were fair worthy.  The others all had floating fruit.  As far as safety and quality, there is no difference in the two jars.  If you're not entering it in a contest, don't worry about a thing -- put it in your pantry.

     When canning pears, don't wait until they are really soft.  Just starting to ripen, maybe on the firmer side is best.  You do cook them for 5 - 6 minutes to get them hot before packing, and then you still have the processing time.  I followed the directions in the Ball canning book. 

     Peeling pears -- no fun.  Worth it -- absolutely!


.....dr momi


Tuesday

4% vs 5%


Check your labels!


     Today I was starting to can dill pickles and realized I had no white vinegar.  Off to the store I went.  I remembered the discussion we had in the Master Food Preserver class about vinegar.  Did you know that 4% acidity and 5% acidity vinegar can be sold side by side on the grocery shelf?  You could have accidentally picked up the 4%.  You must can with 5% acidity vinegar.  Somewhere on the label it will tell you, but, you really have to look for it.  It's in really small print.  Go ahead and clean your windows with 4% vinegar, but please don't can with it!


.....dr momi


Saturday

Canning Blueberry Spice Jam

     We made this Blueberry Spice Jam at our Master Food Preserver class. I've made blueberry freezer jam before and didn't care for it, but this Blueberry Spice Jam is right up there with strawberry for me!  The recipe is in the "Making Jams, Jellies, & Fruit Preserves" booklet put out by the Wisconsin-Extension Cooperative Extension.  You can buy it here.  Or call them at 1-877-947-7827.


Crush 5 cups of blueberries one layer at a time.


Add 1 TBL. of lemon juice, 1/2 tsp. of cinnamon,  3/4 cup of water
 1 box of powdered pectin, and 1/4 tsp. butter. (to reduce foaming) 
Now cook it on high heat while you are stirring, to a rolling boil.


Make sure your jars are sterilized and staying hot.
....and your lids are warm (not boiling) in a shallow pan.


...and have 5 1/2 cups of sugar measured and ready to go.


As soon as it gets to a rolling boil, add your sugar all at once.
Now bring it back up to a rolling boil.  (keep stirring)
When it is really going -- time it for 1 minute.
Then take off heat.


This is a rolling boil.


     After you take it off the burner, skim the foam off, or, use this cool tip I learned.  Lay a piece of waxed paper all over the top and when you lift it, all the foam comes with it.  Cool!  Fast and less waste.  Now fill your jars to 1/4 in. from the top.  Wipe the rims, put on the caps, and the rings.  Tighten the rings just to "fingertip" tight.   The two piece cap needs to "breathe" a little -- that's what gets rid of oxygen.  Use a towel in your hand -- the jars are really hot!

     Put the jars in a water bath canner.  Make sure there is 1 to 2 inches of water above the jars.  When it comes to a rolling boil, time it for 5 minutes.  When time is up, turn off the burner, and lift the lid so the steam goes away from your face.  Let the jars sit for 5 minutes.  Then using a jar lifter take them out and let them sit on the counter.


Use a jar lifter.  Anything else is just dangerous.


Jar lifters have many uses.  They can also
be monster truck lifters.  :-)


Now sit back and listen to the jars "ping" as they can.  We always count :-)  This is great jam.  Enjoy!


The jar with the scrap of paper on it will be my fair entry.   ...a perfect 1/4
inch headspace.  All the decorative jars will be Christmas gifts!


.....dr momi

Tattler Canning Lids


Try them out,
http://www.reusablecanninglids.com/
       I just got a late Christmas present from my sister-in-law.  (Getting together this year didn't happen - long story)  It's what I asked for.  Tattler reusable canning lids.  I'm so excited to try them.  The reviews on them are great.  They work in the pressure cooker and boiling water method.  They aren't exactly cheap (and she got me 6 doz. of them!), but they last over and over again.   Since I'm doing a lot more canning these days these will be used!
     I have 2 daughters that are chiropractors.  They work in their Dad's clinic which is 3 minutes away from our house.  Needless to say, it is really easy for them to show up on their lunch break and say "what's to eat".  Lots of times there are leftovers, but just as many times I will say "eggs"......as in "nothing great".
     Yesterday I had leftover barbecue thawing but nothing else, and the conversation went like this.  "Green beans, I want some green beans to go with it."  "Well go downstairs and get some."  "Mom! don't you ever tell me there's nothing to eat, there's tons of canned goods down there!" :-)  I reminded her it wasn't all that much.   I would really like to have 2 years worth of say, green beans, in case there is a year the crop fails.  She came up with a pint of green beans and a pint of canned potatoes to go with the barbecue.  We talked about how easy it is to make a decent meal (as in good for you, -- organic from the garden) when you come home from work, if you have canned goods.  The ultimate "fast food" for anyone working and putting on supper for the family.  The food is already cooked -- just heat it up! I canned venison and salmon for the kids this year, obviously I didn't can enough.  They are all out already.
     If you want to can along with us this year, start getting ready now.  I will be walking you through it this summer. Buy jars and lids, water canners are cheap and you should definitely pick one up, you can can fruits this way.  You can't can meat and plain vegetables in a water canner though.  If you decide to get a pressure cooker, don't even bother to get a cheap one.  Make sure it has a dial on it so you can tell exactly what the pressure is.  More on all of this to come.